Mastering iOS Navigation: Coordinators, ViewCoordinators, and Routers
Introduction
With the introduction of NavigationStack and NavigationSplitView in iOS 16, we now have the power to control navigation similarly to how we did with UIKit. However, as with anything new, it requires a different approach than the traditional NavigationView. Therefore, if we want to harness the dynamic navigation capabilities offered by NavigationStack, it's essential to embrace new design patterns. In the ever-evolving realm of iOS app development, efficient and user-friendly navigation is not just a luxury; it's a necessity. In a recent in-depth presentation, I had the opportunity to explore this topic comprehensively. In this blog, I aim to share those insights, focusing on three key strategies: Screen Coordinator, ViewCoordinator, and Router.
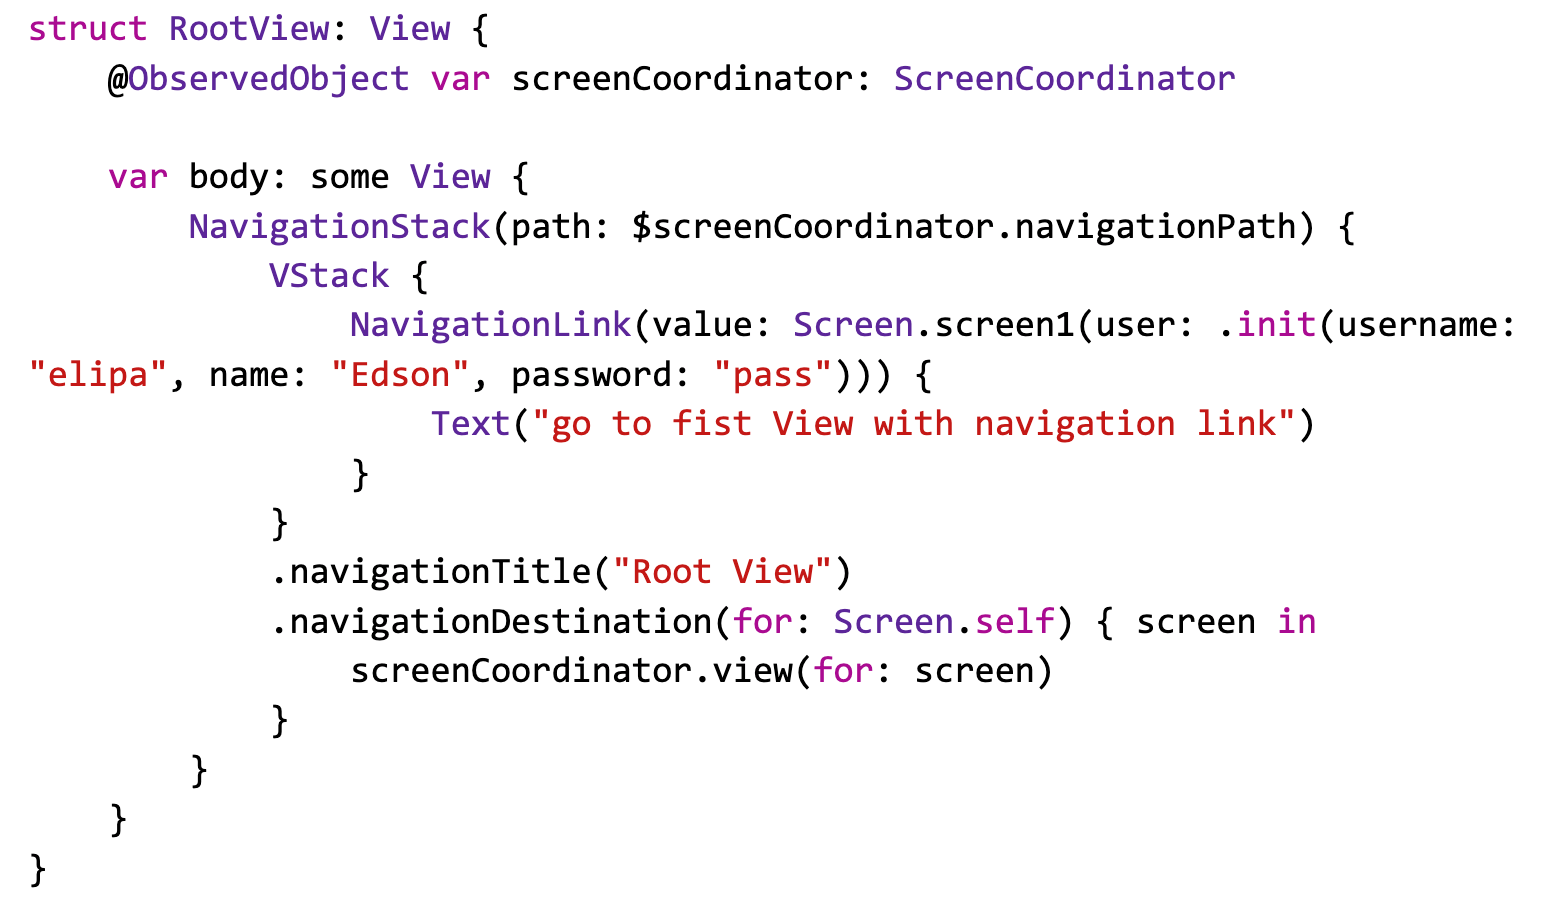
- Define the path Variable: Begin by creating a variable named path of type NavigationPath(). This variable will track the current navigation location.
- Use NavigationLink with value: Employ NavigationLink to establish transitions between views. When using NavigationLink, make sure to set the value parameter to the corresponding NavigationPath for each destination. This enables the selection of specific paths for navigation.
- Customize Navigation with .navigationDestination : To tailor navigation routes and behaviors, leverage the .navigationDestination(for: ) modifier. This powerful tool allows you to define navigation paths dynamically, offering precise control over transitions and application flow.
By following these steps and utilizing the combination of NavigationStack, NavigationPath, NavigationLink with value, and .navigationDestination, you gain the capability to create a highly dynamic and user-friendly navigation experience in your SwiftUI app.
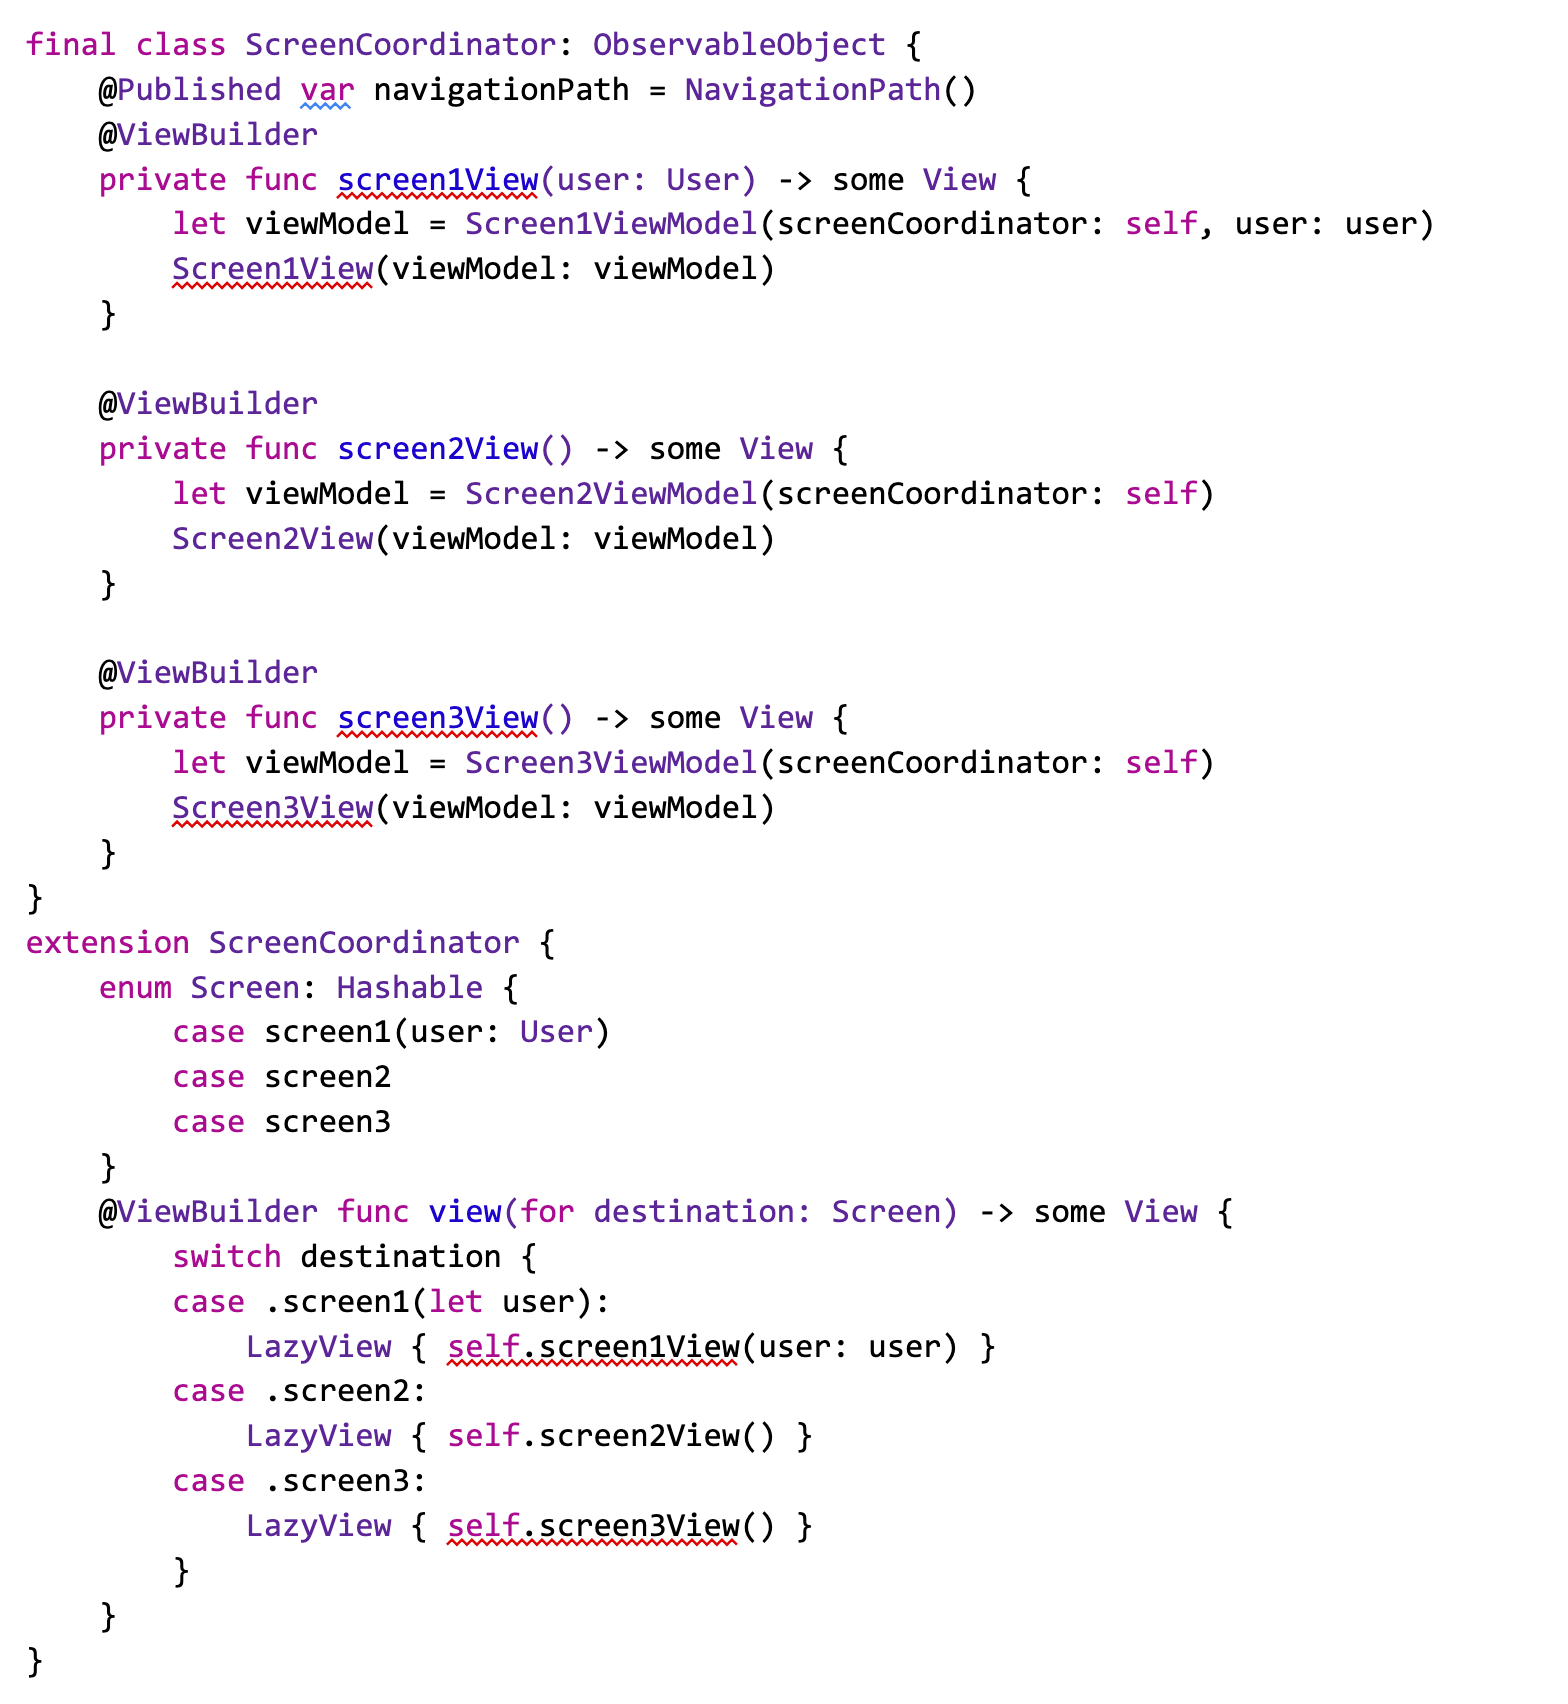
Screen Coordinator:
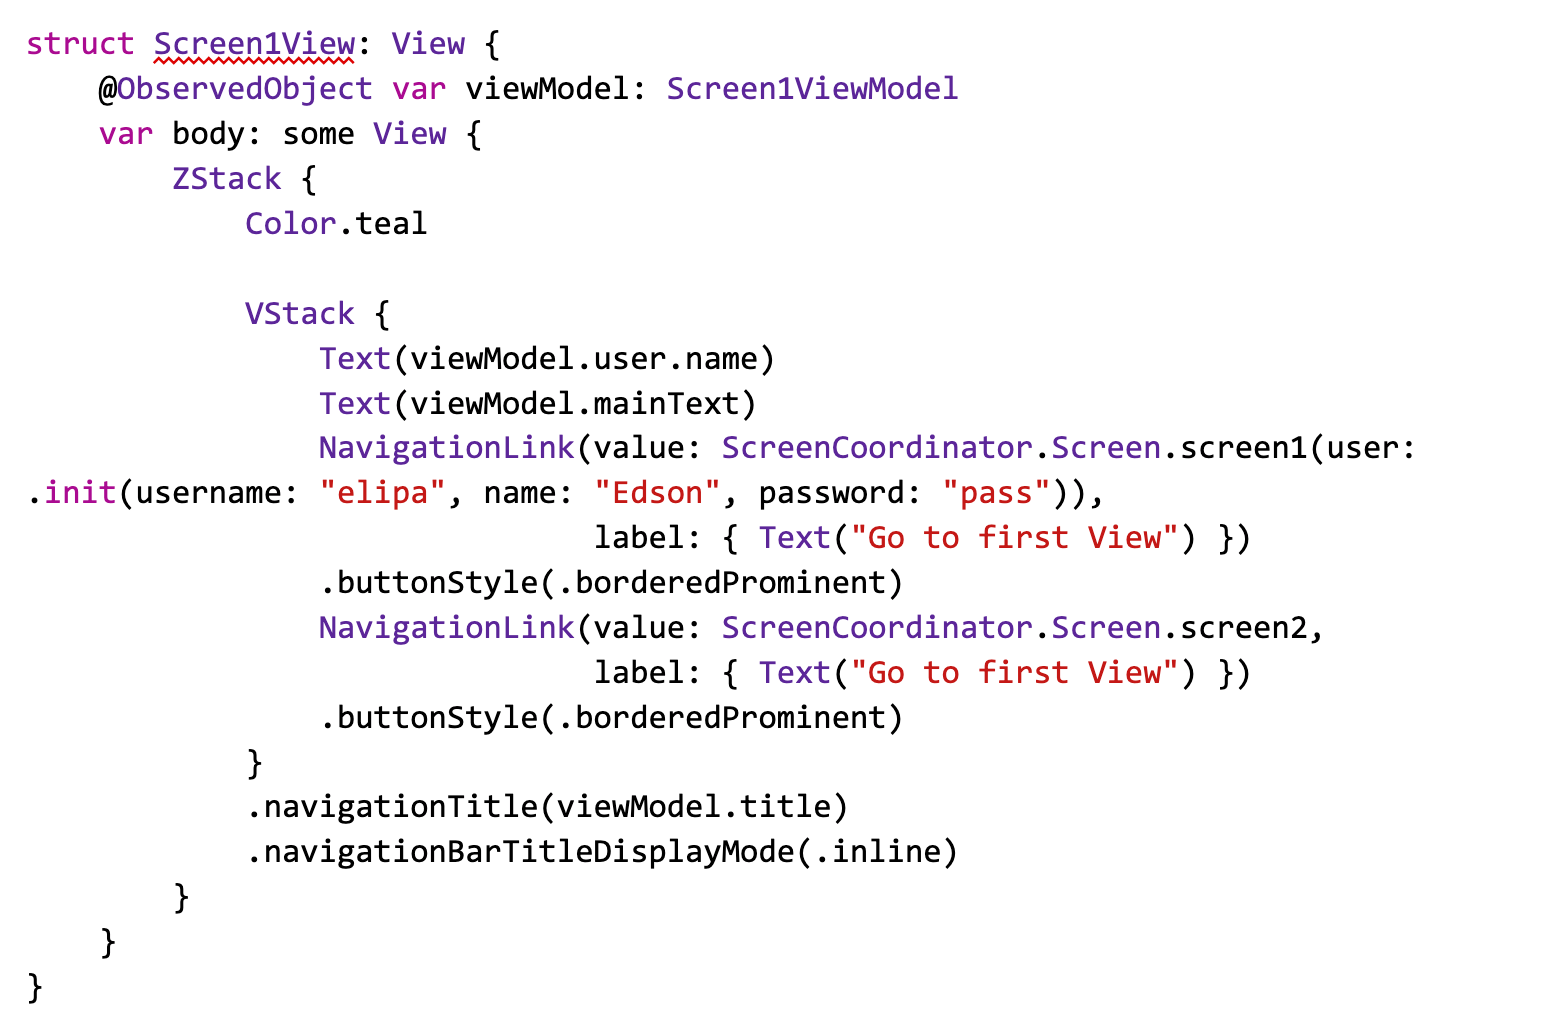
The Screen Coordinator plays a pivotal role in app navigation by overseeing the views to be shown across the navigation flow. Within the app's structure, an enum is defined, named "Screen," which contains cases representing different views accessible within the app. Additionally, a function called "view" is implemented within the Screen Coordinator. This function takes a "destination" parameter and, based on that specific destination, returns the corresponding view. The magic happens when we utilize the ".navigationDestination()" modifier in our views. Within this modifier, we specify the Screen Coordinator's destination type (Screen). When navigation to a particular view is triggered, this modifier automatically invokes the Screen Coordinator's "view(for: )" function, providing it with the corresponding destination as a parameter. Thus, the Screen Coordinator determines which view should be displayed in response to navigation, simplifying UI management and navigation throughout the app.
The Screen Coordinator method, acting as the central command for app navigation, brings considerable benefits. It shines in its ability to centralize navigation control, significantly reducing the coupling between view controllers and easing the management of complex navigational flows. This makes it a robust choice for large-scale applications with numerous screens and complex navigation requirements. However, its complexity can be a double-edged sword. For smaller projects, this approach might be overkill, introducing unnecessary complications. Additionally, the steep learning curve associated with mastering Screen Coordinators can be a barrier for beginners, requiring a solid grasp of architectural concepts.
ViewCoordinator for Each View:
The View Coordinator approach takes a concept similar to the Screen Coordinator but brings it down to the granularity of individual views. In this design, each view has its dedicated View Coordinator responsible for managing interactions specific to that view. Each View Coordinator defines the views to be used within its scope and handles navigation-related operations. Just like in the Screen Coordinator approach, an enumeration ("Destination") is utilized to represent various view destinations. However, the key distinction lies in the fact that each view controller has its own declaration of the "Destination" enum and its respective "navigationDestination" modifier. Unlike the Screen Coordinator, which typically has a single declaration at the root of navigation.

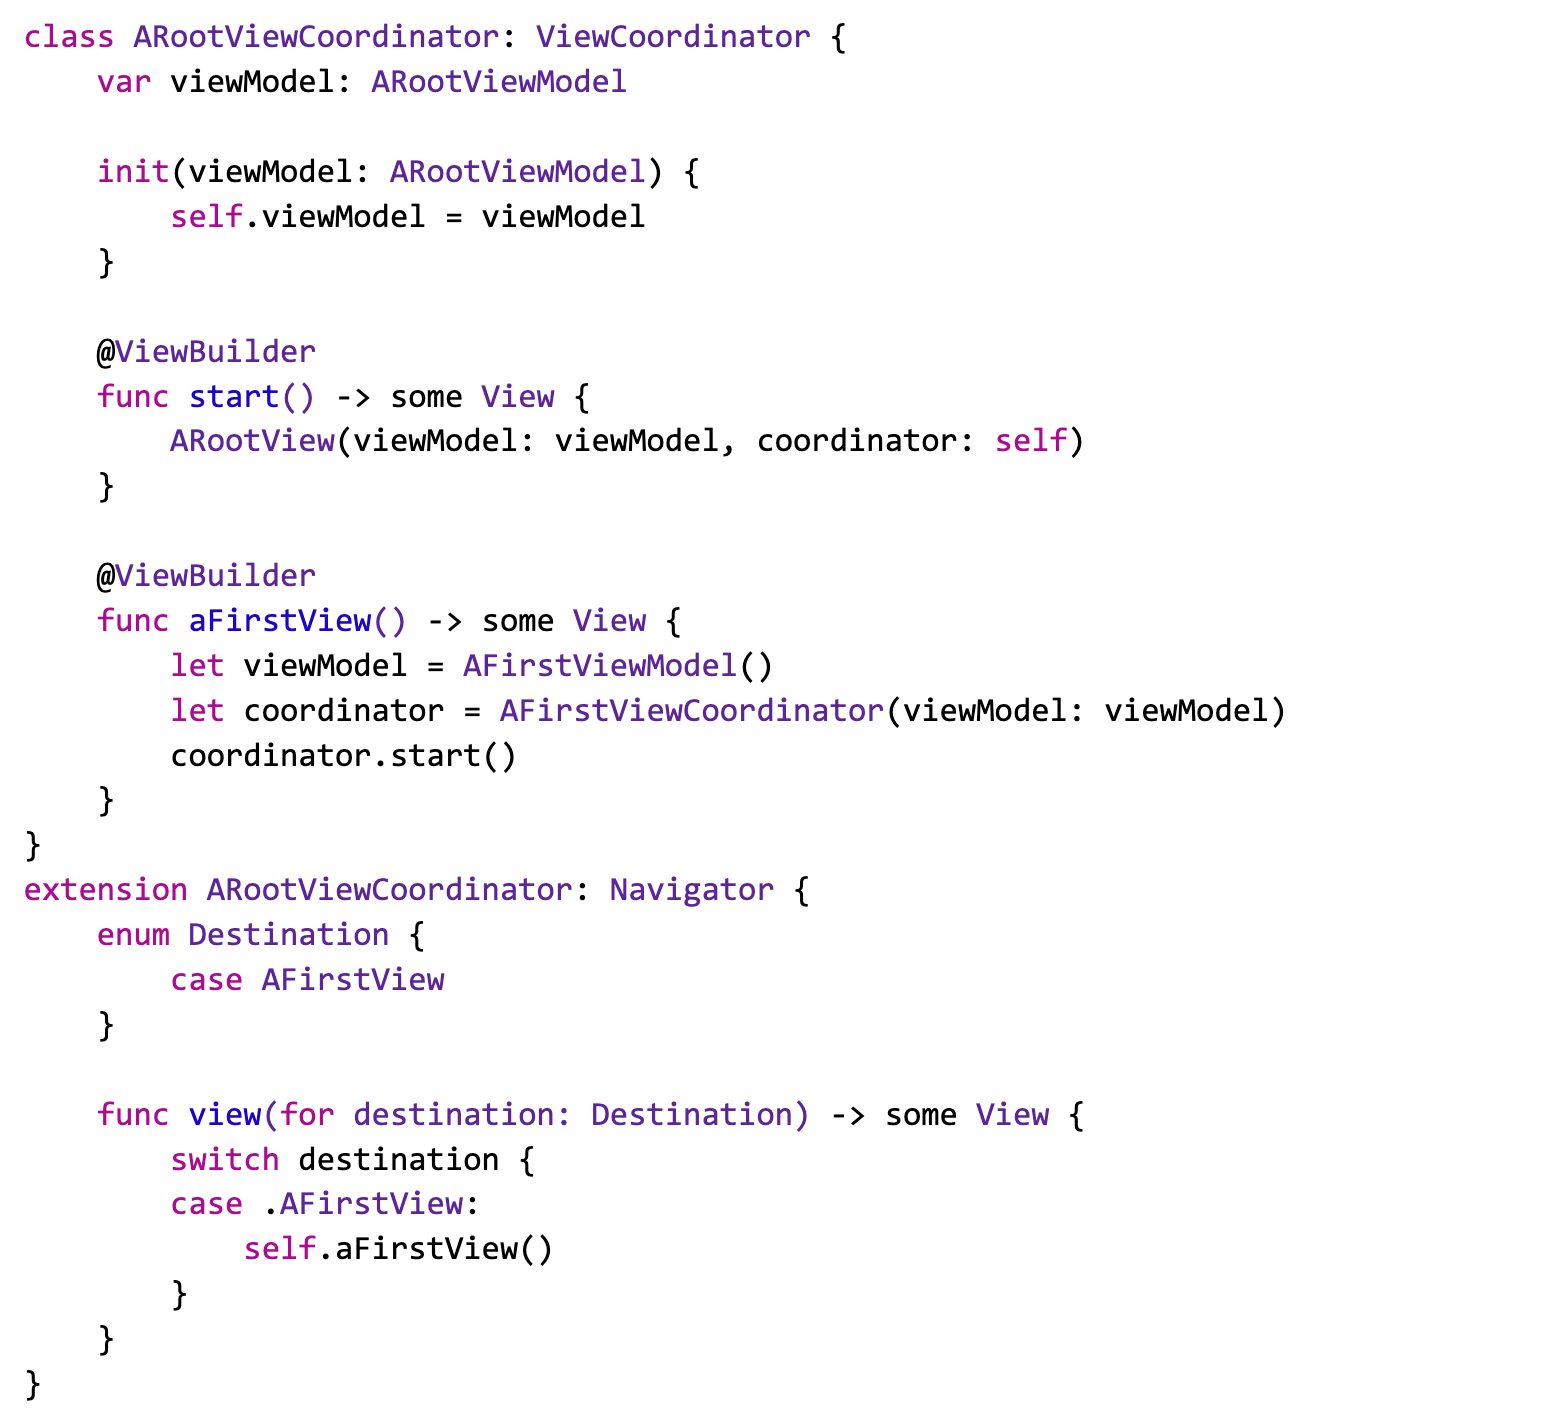
Adopting a ViewCoordinator for each view presents a more decentralized approach to navigation. This method excels in providing granular control over the navigation of individual views, enhancing modularity and organization. It's particularly advantageous for applications that benefit from a modular design, allowing each section or screen to manage its own navigation independently. However, this approach can lead to a proliferation of redundant code, especially in simpler applications where such fine-tuned control isn't necessary. The added overhead of managing multiple coordinators can sometimes outweigh the benefits, particularly in smaller or less complex applications.
Router for Programmatic Navigation:
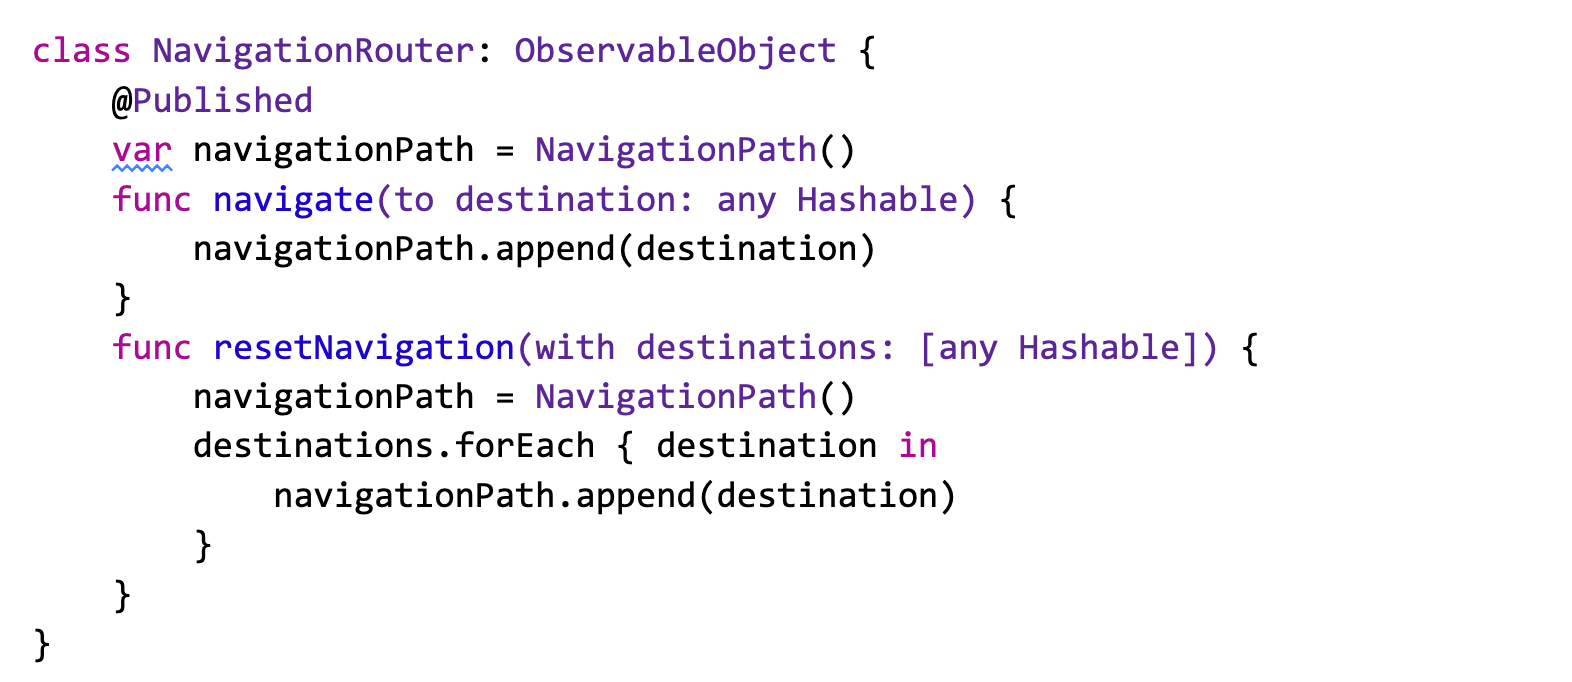
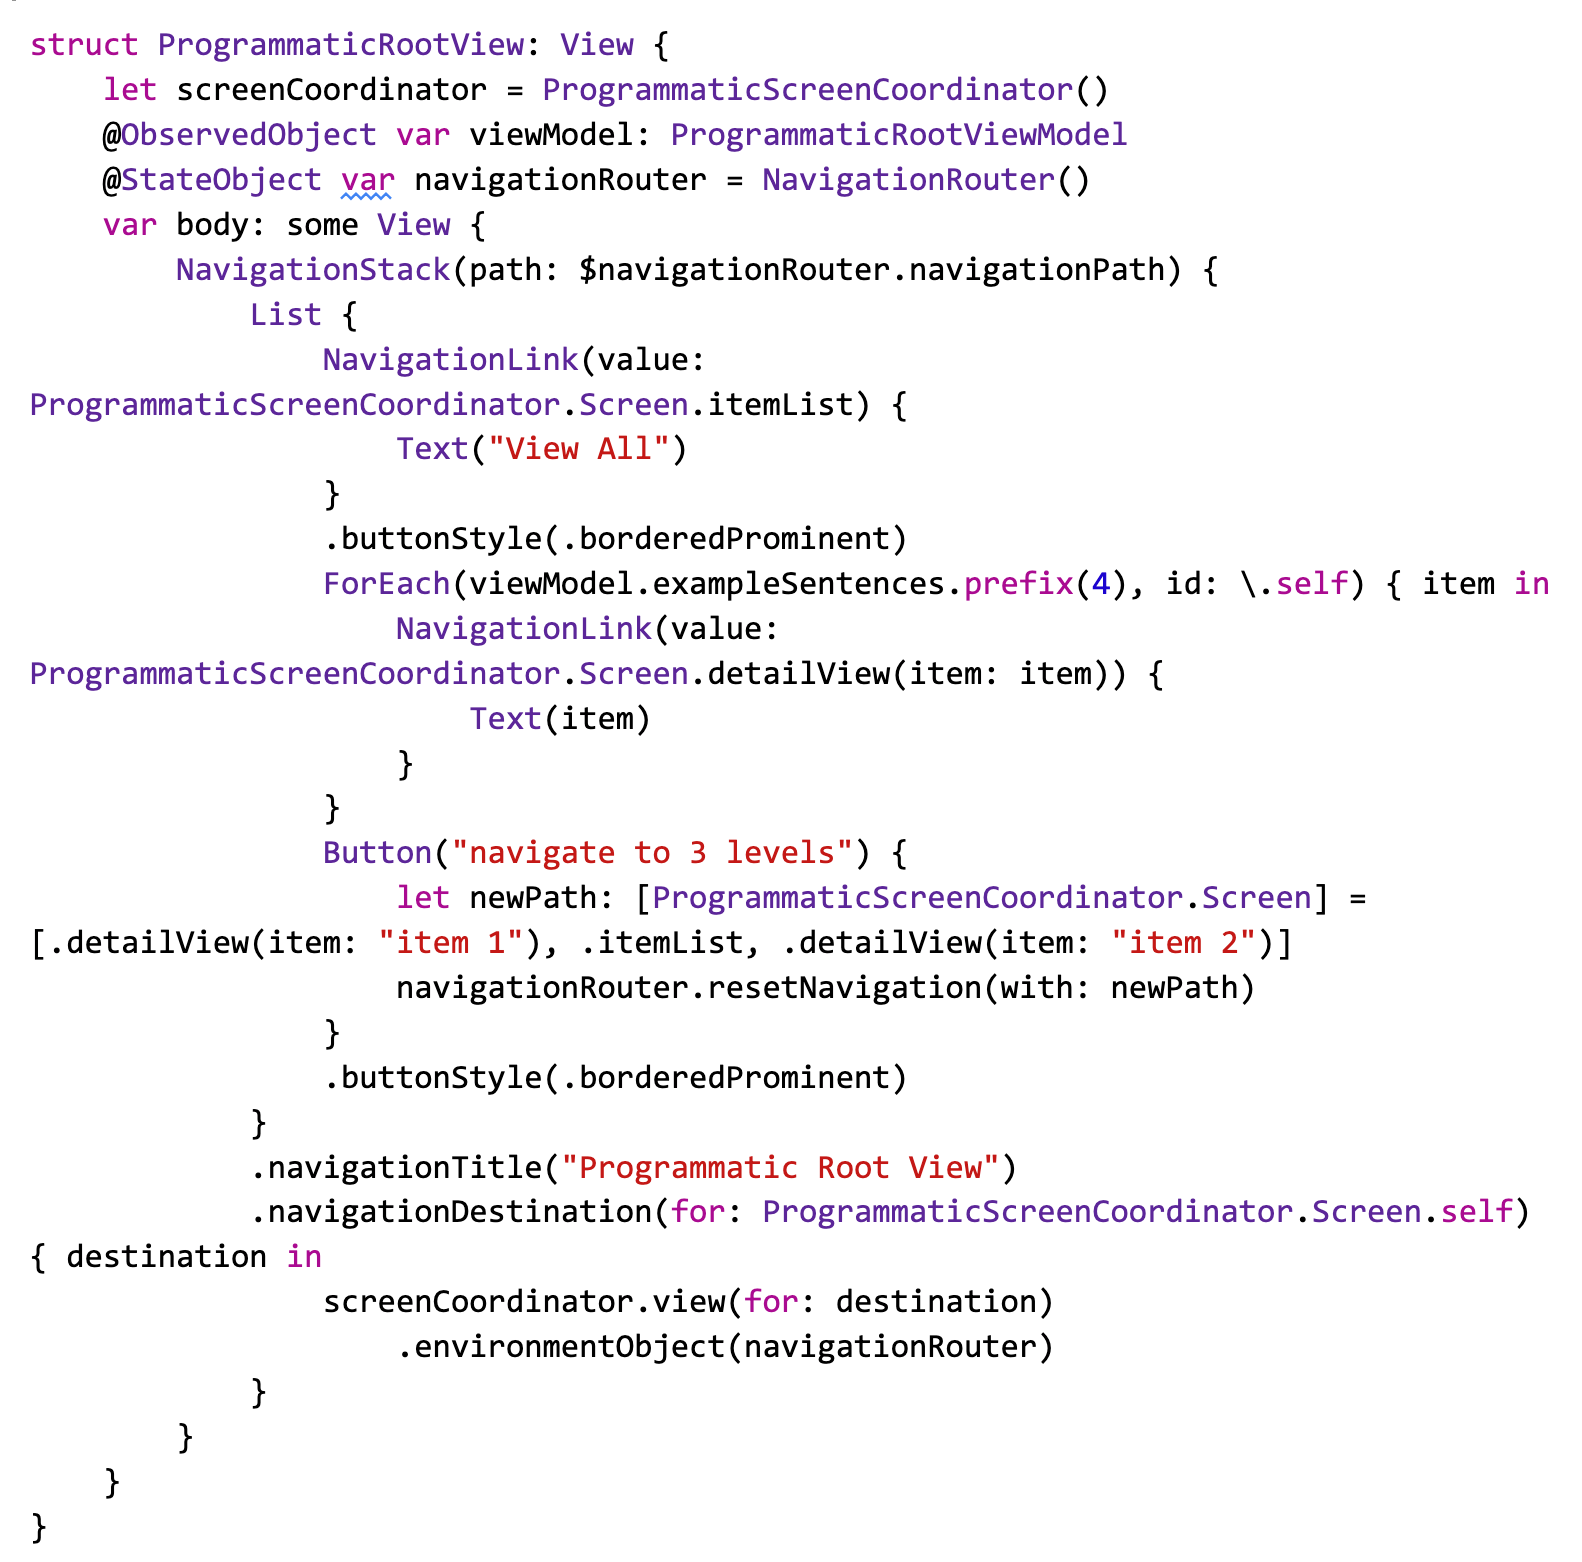
In the Router for Programmatic Navigation approach, we build upon the Screen Coordinator concept while introducing a new class called NavigationRouter. The primary responsibility of this class is to exclusively handle navigation. Within the NavigationRouter class, we define a variable named "path," which should be of type NavigationPath() and marked as @Published. This "path" variable is added to the "path" parameter of the NavigationStack. In this class, we also define functions like "navigate(to: Destination)," which enables programmatic navigation. Additionally, a "resetNavigation(with [Destination])" function can be implemented to return to the root view or reset the navigation path with different views. This NavigationRouter is then shared with other views using the ".environmentObject()" modifier, and each view accesses it using the "@EnvironmentObject" property wrapper. This approach provides a structured way to manage programmatic navigation within the app, offering greater flexibility and control over the navigation flow.
The Router approach, designed for dynamic and programmatic navigation, offers a high degree of flexibility and adaptability. It's particularly well-suited for applications requiring complex, non-linear navigation flows and those with conditional navigation logic. This method allows developers to tailor navigation precisely to the app's needs, accommodating a wide array of navigation scenarios. However, this flexibility comes with its challenges. The complexity inherent in setting up and maintaining a Router-based system can be daunting. It also presents a higher risk of introducing hard-to-debug issues, especially in large and complex applications where navigation paths are less predictable.
Final Thoughts:
In selecting the right navigation method, it's crucial to weigh these pros and cons against the specific needs and complexity of your project. Each method offers distinct advantages, but also comes with its own set of challenges. The choice ultimately hinges on finding the balance between the desired level of control, the complexity of the app, and the ease of maintaining the navigation structure.
Best Practices and Tips:
Irrespective of the approach, some universal best practices apply:
- Keep navigation logic separate from business logic.
- Ensure that your choice aligns with the scale and complexity of your app.
- Aim for clarity and maintainability in your navigation structure.
Explore on GitHub:
To see these navigation techniques in action, visit our GitHub repository. You'll find code examples and documentation for each strategy. Whether you're a seasoned iOS developer or just starting with SwiftUI, this resource can accelerate your learning. Feel free to review, fork, and contribute. Your feedback and contributions are appreciated.
GitHub Repository: github.com/edsonlipa/NavigationStack-in-IOS16